Repairing exterior stone stairs
 Can I ask you a question about repairing stone stairs? We have some
friends who recently bought a house along a river in the Texas hill
country. This house is roughly 30 feet above the river, and it's
a fairly steep hill to get to the house from the river. The existing
steps between the house and river are made from medium-sized stones,
many of which are loosely fitted together. Most of the steps have
fallen apart, and our friends have asked me to help them repair
them. Could this possibly be as easy as knocking out the loose stones,
putting down some mortar, and replacing the stones? If not, can
you please offer me some basic guidance on how best to tackle this
task for beautiful, long-lasting stairs? —Thanks for any advice you
might be able to offer. Can I ask you a question about repairing stone stairs? We have some
friends who recently bought a house along a river in the Texas hill
country. This house is roughly 30 feet above the river, and it's
a fairly steep hill to get to the house from the river. The existing
steps between the house and river are made from medium-sized stones,
many of which are loosely fitted together. Most of the steps have
fallen apart, and our friends have asked me to help them repair
them. Could this possibly be as easy as knocking out the loose stones,
putting down some mortar, and replacing the stones? If not, can
you please offer me some basic guidance on how best to tackle this
task for beautiful, long-lasting stairs? —Thanks for any advice you
might be able to offer.
 Interesting question! Are they a true flight of stairs with
stone risers and treads and a handrail or are they essentially stones
buried in the ground to form stepping pads in a winding path up
to the home? It's hard to offer a definite solution without seeing
it—this is one of those cases where a picture sure would come
in handy—but the short answer is yes, it could be as easy as
using mortar and putting the stones back into place. Only you can
judge what your time is worth but you will want to consider how
many steps are damaged, whether you will have to completely dismantle
each step in order to put it back together correctly, and if the
bedding foundation needs repairing. If you are trying to keep the
flight of stairs within the aesthetics of its environment, then rebuilding
the stone steps would certainly be the course to take. If a complete
rebuild is in order, consider the following alternative which uses
8" x 8" treated material that will blend well with the
environment. Interesting question! Are they a true flight of stairs with
stone risers and treads and a handrail or are they essentially stones
buried in the ground to form stepping pads in a winding path up
to the home? It's hard to offer a definite solution without seeing
it—this is one of those cases where a picture sure would come
in handy—but the short answer is yes, it could be as easy as
using mortar and putting the stones back into place. Only you can
judge what your time is worth but you will want to consider how
many steps are damaged, whether you will have to completely dismantle
each step in order to put it back together correctly, and if the
bedding foundation needs repairing. If you are trying to keep the
flight of stairs within the aesthetics of its environment, then rebuilding
the stone steps would certainly be the course to take. If a complete
rebuild is in order, consider the following alternative which uses
8" x 8" treated material that will blend well with the
environment.
For safety's sake and for durability, take your time and work carefully.
Also this project may involve some code issues which may require
a building permit—either for repairing or rebuilding. Have
the homeowners check with their local building department before
you begin.
Personally, I think it's easier to start at the bottom and work
up, so begin with that first step and remove the existing stones.
Each completed step will be constructed of two pieces of 8"
x 8" treated material bolted together and anchored to the ground
with rebar so you will need to level out the bedding soil to your
desired step width (3' wide makes a comfortable step) and to a tread
depth of 16". Ideally, your bedding foundation should consist
of sand and 3/4" of crushed gravel to help with water
drainage and to keep standing water away from the underside of the
treads.
To securely anchor the step, set two pieces of 5/8" by 16"
rebar into the ground. Position the pieces of rebar 6" in from
each end of the step, dead center of the back tread piece, and extending
4" above grade. If the bedding soil is loose, you will have
to set the pieces of rebar in concrete (in fact, rebar set in concrete
will provide the best anchor for your treads). Using the same layout,
drill two 5/8" holes 4 1/2" into the underside of
the back tread piece. Finally, fit the tread piece down over the
two 4" rebar extensions, fitting the extensions into the two
4 1/2" holes drilled earlier; you might need to use a sledgehammer,
but first be sure to protect the tread's top surface.
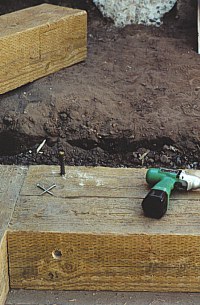 |
A picture is supposed to be worth a thousand words, so I've
included a couple here. Notice the rebar in the back tread
piece in the picture to the left. It is positioned 4 inches
in from the end because on this set of stairs the 8"
x 8" will serve as both riser and tread.
|
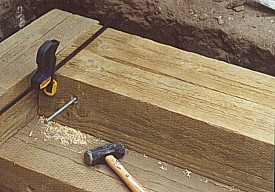
| The picture to the above right shows how the front
tread piece was placed over the rebar, and the back piece now
sits on a bed of gravel, held in place with a bar clamp, while
the bolts are tightened. |
Now you're ready to attach the front piece of the tread to the
back piece using two 3/8" by 12" long lag bolts with washers.
You'll need two bolts for steps up to three feet wide, one on each
end—4 inches in and centered on the treated material. Wider
steps may require three or more bolts (one on each end and the others
evenly spaced between them). Use a spade wood bit slightly wider
than the diameter of a washer to drill the front piece of the step
deep enough to recess by 1/4" the head of the lag bolt
and the washer. Then drill a 3/8" hole for the lag bolt in
the center of the recess hole. Use an 11/32" drill bit to drill
a corresponding pilot hole in the front of the back tread piece.
Insert the bolt through the washer, through the front tread piece,
and into the back tread piece. Then snug up the bolt using a ratchet
wrench or (ideally) a cordless impact wrench. You may want to drill
all the holes for the lag bolts before anchoring the back tread
piece to the rebar.
That's the procedure—now you just have to work your way up
the entire flight, step by step. You can probably save some time
by cutting all the tread pieces to size and drilling holes for the
lag bolts assembly-line style.
Here's one final idea to consider—mortar one 8" x 8"
piece of treated material in the center of the step area and then
mortar stones all around it. This will produce a large flat stepping
pad (tread) for safety as well as a unique look that complements
the environment.
Copyright ©
2002 & 2005 LAF/C.R.S., Inc. All rights reserved.
Question answered by Leon A. Frechette. This question originated from extremehowto.com
[ Back to Top ]
|