Floating walls and bathroom requirements
 My question is an
extension of the floating wall question for a basement with expansive
soil problems. I am plumbing a 3/4 bath, and I am unsure how to
install the shower with the floating wall requirement. Is it allowable
to "reverse float" a wall, with the 3" gap at the ceiling so that
the shower can rest on a solid base? Does the plumbing (plastic
and copper) require some type of slip joint attachment so it will
not be torn apart if the soil expands? Is there a resource that
provides comprehensive construction information regarding floating
walls? Any help will be GREATLY appreciated!!! My question is an
extension of the floating wall question for a basement with expansive
soil problems. I am plumbing a 3/4 bath, and I am unsure how to
install the shower with the floating wall requirement. Is it allowable
to "reverse float" a wall, with the 3" gap at the ceiling so that
the shower can rest on a solid base? Does the plumbing (plastic
and copper) require some type of slip joint attachment so it will
not be torn apart if the soil expands? Is there a resource that
provides comprehensive construction information regarding floating
walls? Any help will be GREATLY appreciated!!!
 When installing a bathroom in an expansion soil
environment, a new set of rules comes into play, mainly, how do you keep the
plumbing pipes from cracking or leaking at the joints? The diagram found in
Floating Partition
Walls? will not be used when installing a bathroom. Instead,
reverse the 3" gap so it is at the top and use crown
moulding attached at the ceiling to cover the 3" gap. When installing a bathroom in an expansion soil
environment, a new set of rules comes into play, mainly, how do you keep the
plumbing pipes from cracking or leaking at the joints? The diagram found in
Floating Partition
Walls? will not be used when installing a bathroom. Instead,
reverse the 3" gap so it is at the top and use crown
moulding attached at the ceiling to cover the 3" gap.
Consider building a cavity in the floor joist area to provide access to the
plumbing pipes passing through this area to the next floor level, for example,
sewer, drain, waste, vent piping, and water supply lines. (Design it so you
have a removable panel in the ceiling to access this area, or build a closet
on the backside so you can have full access to this area.) This cavity should house special plumbing adapters and/or fittings to help
absorb the pressure or stress if and when the pipes should move upward because
of soil expansion.
All water supply lines should have flex lines installed between the main water
supply in the cavity area. If you are using copper pipes, solder on a threaded female
coupling so you can thread on the flex lines. Lines
can be purchased at your local home center.
For PVC or ABS sewer, drain, waste, and venting piping use a rubber coupling
(expansion joints)
installed in the same cavity area between each of these pipes. (Note: A shielded coupling or elbow may be required, so check with your local building
department for approval.)
Any plumbing pipes that are rigid at the ceiling line (3" floating area) could
bend and/or crack if the soil should expand. It is important to leave space
for the pipes to move within the cavity area and using the specialty items listed
above will help prevent any pipe damage.
As a reminder, be sure to consult with your local building department and
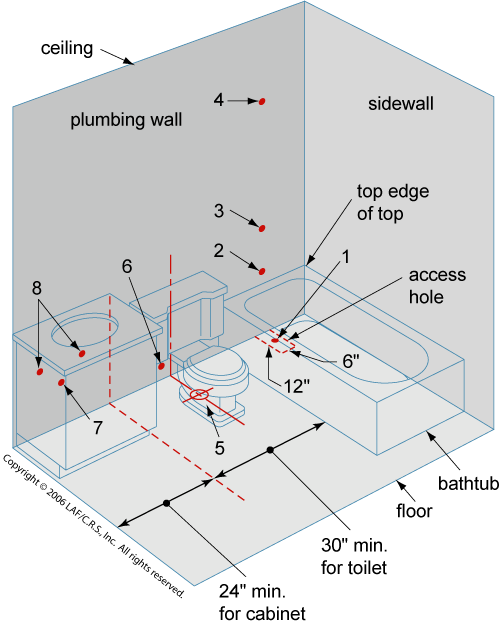
get a building permit for this project. I have also enclosed a standard rough plumbing layout (see diagram below) for
a three-fixture bathroom setting that should help. The recommended measurements
are keyed to numbers in the figure which are explained in the following paragraphs.
It is important to know that the measurements start at a sidewall and are always given as "dead center." Remember, also, that there is a big difference between rough framing and a finished
wall. This can have a quite an impact, especially when a toilet is involved,
because a half-inch difference (the thickness of wallboard) between rough and
finish can determine whether or not you can set the toilet.
Bathtub Measurements:
1. The bathtub drain in the floor is 3" below the finish floor level
and out 1 1/2" from the rough wall. The tub drain is also centered in 30"
of space, the width of the bathtub. You will need to cut a minimum 6" by 12" access
hole in the subfloor, 11" in from the sidewall, for the waste and overflow
drains. If you are installing a shower, make sure you have your shower pan
in hand so you can correctly locate the drain.
2. The tub spout is located 5" above the top edge of the bathtub.
3. The tub faucet is 10" to 12" above the top edge of the bathtub.
In a shower stall, the shower faucet should be 48" from the finish floor.
4. The shower head should be 48" to 54" from the tub faucet.
Toilet Measurements:
5. The toilet drain from the center of the drain to the rough framing
is 12 1/2" and is centered in 30" minimum of finished space. This applies
to a standard toilet installation. There are specialized toilets on the market
that require different rough plumbing dimensions. Be sure to check the installation
instructions included with your toilet.
6. The water supply is located 6" up from the finish floor and is
6" to the left of the center of the toilet drain as you face the wall. Bring
the water supply line out 5" to 6" from the rough framing. It will be cut
off later when it is time to install the shutoff valve.
Wash Basin Measurements:
7. The wash basin drain is 18" to 20" above the finish floor, depending
upon the height of the cabinet, and is centered in a minimum of 24" of cabinet
space.
8. The water supply lines are 4" to the left and right of the drain.
Bring the lines out 4" to 6" from the rough framing (they will be cut off
later when it is time to install the shutoff valves) and 22" to 24" off the
finish floor, depending upon the height of the cabinet.
I hope this helps and I always invite you back if you have any other questions—good
luck!
To learn about installing floating furring walls, click here.
To understand more about bathroom layouts, I recommend my book, Remodeling A Bathroom. The book outlines other procedures
in-depth and feature great photos and diagrams. To order your copy, click here or click the purchase button below!

Copyright © 2001, 2006, & 2007 LAF/C.R.S., Inc. All rights reserved.
Question answered
by Leon A. Frechette.
[ Back to Top ]
|