Dress up your chandelier with a ceiling medallion
by Leon A. Frechette
Is there a better way to spruce up a chandelier than with a ceiling
medallion? This decorative touch just goes hand-in-hand with crown
mouldings. Recently, I installed a medallion by Fypon,
the leading manufacturer of architectural urethane millwork products.
If you are considering a ceiling medallion for your home, you should
find these installation instructions helpful.
The entire project took about 4 hours from start to finish, including
2 hours of adhesive drying time. Tools you will need for this project
are a keyhole saw, caulking gun, pencil, ladder, painter's blue
masking tape, and a couple of 2x2s to support the medallion while
the adhesive dries. You will need a special adhesive for urethane.
If this product is not available at your local home center, check
with the dealer who supplied you with the medallion.
Choosing the correct medallion style for the room should be your
first priority. For our dining room, which is 13' across, we chose
the Pembroke pattern. This particular medallion is 18 3/8"
in diameter and features a 2" projection, about the right size
for our narrow room. Medallions are available in a variety of designs,
diameters, and projections.
To begin, turn off the power from the source, remove the retaining
nut (if your chandelier is set up this way) from the threaded chain
support loop, and drop the decorative cover plate. The support loop
is attached to a threaded nipple which will be too short once the
medallion is in place, so go to your local hardware store and purchase
a new one that is about 3 3/4" long (it will cost less
than a dollar). Now, remove all light bulbs and glassware from the
chandelier.
Again, make sure the power is off and then disconnect the ground and two
fixture wires from the neutral (white) and hot (black) wires. Be
sure to install the wire nuts back on these two wires just in case
someone turns the switch back on. Now, unthread the chain support
loop from the threaded nipple—and hold onto that chandelier!
Once you get it unthreaded, you will learn immediately just how
heavy it is! Move the chandelier off to one side as you prepare
to install your medallion.
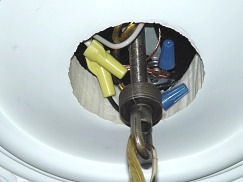
First go back to the electrical box and check to see if the wires
will be long enough once the medallion is in place. If not, it's
okay to extend the wires—just make sure that you wire nut together
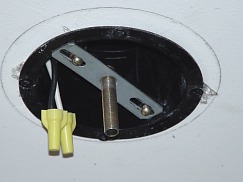
wires of the same color. As you look at the box, remove the threaded
nipple from the mounting strap. Note that two screws go through
the strap and mount to the electrical box. The spread is around
3"+ between screws. The hole you need to cut in the medallion
should be about the size of the outlet box so these screws are accessible.
Double-check the size of the decorative cover plate—you don't
want to cut a hole larger than this plate. The size of the electrical
box should be about correct.
To cut the medallion, take it outside and lay it across the tops
of two sawhorses. A saw I would like to recommend for this cut is the
Rockeater
by Shark Corp. because its blade is stiff enough to handle this
project. First mark where you want to cut and then pierce the material
with a keyhole saw. This will take some doing—the trick is
to rock the blade back and forth as you pierce the urethane. It
will be slow cutting but it is a safe way to go—a power tool
may damage the surface. I also found it easier to cut counter-clockwise
than clockwise. The manufacturer also offers medallions with a pre-cut
hole to make installation even easier.
If your electrical box is not mounted flush with the surface, then
you will need to dado the backside of the medallion. This can be
done with a break-away blade utility knife. First in "normal"
mode (blade sticking out only to the point), cut around the circumference
marked. Then extend the blade and cut into the material surrounding
the first cut from the side. In most cases you'll be looking at
a cut that is 1/4" deep and 3/8" wide. When this is complete,
do a trial run to make sure the medallion will lie flat against
the ceiling.
Don't apply the adhesive just yet! It's important for the medallion
to land dead center on the threaded nipple so the decorative cover
plate will land dead center on the medallion. If you are off,
it will be obvious. A white decorative cover plate (instead of a
colored one) may provide some camouflage if you are off just a bit.
Better yet, take your time during this trial run and precisely mark
the medallion's final resting place on the ceiling using painter's
blue masking tape.
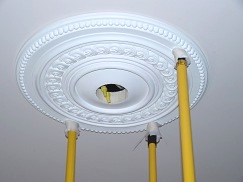
Also before you apply adhesive, cut two 2x2s to a height that can hold
the medallion while the adhesive sets for a couple of hours. I used
extended squeegee handles. Be sure to put some type of padding on
the ends of the 2x2s so you won't mar the medallion. Also don't
put too much pressure on them. Apply the glue to the ceiling medallion
not to the ceiling. Also make sure that the glue is held back from
the medallion's edge by at least an inch. This way glue won't ooze
out on the ceiling.
When you are satisfied that the medallion is properly positioned,
dead center of the threaded nipple, glue it in place. The manufacturer
highly recommends the use of fasteners into the joist or hollow
wall fasteners in addition to adhesive. This is the time when a
second pair of hands will come in handy. Once the adhesive has set,
you can begin to reassemble the chandelier.
Pause again to consider a couple of things. Do you plan to paint
the ceiling and the medallion? If so, apply paintable latex caulk
around the medallion where it meets the ceiling. Use a sponge and
warm water to blend the caulk between the medallion and ceiling.
After it dries you might have to apply a second coat; if not, then
you can begin to paint. To read about the proper steps to paint,
click here.
Before hooking up all the chandelier wires, do another trial run
to make sure the decorative cover plate lands on center. If you
discover it does not, you maybe able to correct the centering by
removing the mounting straps and widening the slot holes or by drilling
new holes that will allow the threaded nipple hole to land on center.
Be sure, though, that you use steel washers when reinstalling with
the screws if you have to modify the mounting strap. The steel washer
will help support the modified area on the mounting strap.
  |
Remember that the fixture wires (including the ground)
have to run up through the threaded nipple before reconnecting.
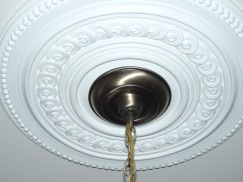
After the wires are connected, tuck them into the medallion hole
and out of the way of the decorative cover plate. Finish the process
by raising the cover plate and reattaching the retaining nut. Now,
step back and admire your work. As you probably noticed, the urethane
medallion is both lightweight and easy to work with. To read a review
of one of Fypon's ceiling medallion products, click here. To order the Rockeater Drywall Saw, click purchase button below!

Copyright © 2002 & 2005 LAF/C.R.S.,
Inc. All rights reserved.
Looking for home improvement Q&As? Click here!
[ Back to Top ]
|