Floating partition walls for basement requirements
 I am finishing the basement of my 18-year-old
house. The basement walls are typical concrete foundation and (so far) I have
experienced no water problems. I plan to install a utility room, bathroom,
and TV room with tile flooring. Recently I learned that my city, Aurora, CO,
requires "floating walls" for basement nonbearing walls to allow for floor
movement in areas where moisture or expansive soil may cause fluctuations
in the level of the basement floor (Denver has the same requirement). I've
heard two variations on proper floating wall construction, so I am interested
to learn your approach. I need to know how to construct both center walls
and those along the foundation. I am finishing the basement of my 18-year-old
house. The basement walls are typical concrete foundation and (so far) I have
experienced no water problems. I plan to install a utility room, bathroom,
and TV room with tile flooring. Recently I learned that my city, Aurora, CO,
requires "floating walls" for basement nonbearing walls to allow for floor
movement in areas where moisture or expansive soil may cause fluctuations
in the level of the basement floor (Denver has the same requirement). I've
heard two variations on proper floating wall construction, so I am interested
to learn your approach. I need to know how to construct both center walls
and those along the foundation.
Additionally, as I frame the walls, I will need to rough in for several
different door widths. Do you have the recommended measurements for 2x4 framing
for a 36", 32", 30", etc., door opening which would accept the corresponding
prehung door available at the lumber mill? —Thank you for your help!
 You have an interesting question that—at first—I
had no answer for! In my 20 years of building, I have never heard the term "floating
walls." However, after some investigation and with help from a friend who happens
to be a building inspector, we were able to come up with an answer. You have an interesting question that—at first—I
had no answer for! In my 20 years of building, I have never heard the term "floating
walls." However, after some investigation and with help from a friend who happens
to be a building inspector, we were able to come up with an answer.
First of all, I should point out that floating wall construction applies to
areas where a home may be built over expansive clay soil. While it may be unique
to the area of concern here, Aurora, CO, this construction technique may also
apply to other areas throughout the United States. Other readers who are
interested should contact their local building department or the City of Aurora Building
Division for more information.
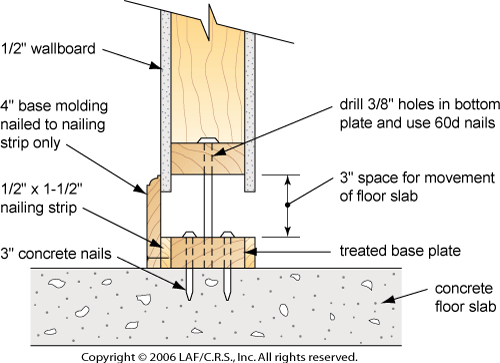
When finishing a basement with floating wall construction, plan to spend some
time completing the extra work that will be required. "Floating walls" simply
means that all partition walls are suspended from the floor joists, and there
will be a 4 1/2" space between the bottom plate and the concrete floor slab.
However, there will be base plate (treated 2x4) attached to the floor with 3"
concrete nails or by use of a stud gun which yields a 3" clearance—see
diagram below. It is crucial that your base plate and wall be plumb.
To learn about walls being built up against the concrete foundation (furring
walls), click here.
To accomplish this, lay the base plate down without nails and measure from
the top of this plate to the underside of the floor joist. This measurement
will be used for wall construction. Measure for all walls and be sure to allow
for the 3" clearance. Then find a straight 2x4 (long enough to reach the floor
and the floor joist), a 6' level, and a helper. Have your helper stand
on the base plate holding the 2x4 against the base plate; place the level on
the inside of the 2x4 to plumb it. Once it is plumb, mark the floor and the
underside of the floor joist and/or backer boards or nailer (small pieces of
lumber nailed between joists)—whatever you plan to nail the top plate of
the wall to. Before nailing to the base plate, make sure that any inside, outside,
and partition walls are at 90 degrees. A framing square comes in handy for this.
When you are satisfied, nail the base plate in place.
Now lift your prebuilt wall so the bottom plate rests on top of 3" temporary
blocks on top of the base plate. Once the wall is in place, check one last time
to make sure the wall is plumb. Now use screws and fasten the top plate to the
floor joist and/or backer board. Additionally, I would also—about every
third stud—nail metal straps on both sides of the studs from the top plate
to the 2x4 studs to help carry the weight. If you are on an exterior wall, consider
putting the straps on the exterior side while the prebuilt wall is still on
the floor. Or when installing the wallboard, use both screws and glue, making
sure that you install screws in the top plate—providing that the wallboard is installed on both sides.
Now for the final and most important step in this type of construction: drill
3/8" diameter holes 3 feet on center through the bottom plate only. Start your
first hole as close as you can to the beginning and the end wall, which includes
as close as you can get on both sides of any door openings. Then place 60d nails
(a spike) in each hole and nail into the base plate below. These 60d nails will
help to stabilize the wall from left to right and allow the floor to expand
upward leaving the wall in place. Once nailed, remove the blocks from under
the bottom plate—use your hammer for this.
Important Consideration: The diagram above assumes the possibility of the basement floor expanding upwards. However, if there are concerns about the finish floor sinking, then replace the 60d nails with either 70d or 80d. The 70d nail (7") provides a 1-inch space between the nail's head and the top of the bottom plate while the 80d nail (8") provides a 2-inch space. This configuration allows the concrete floor to drop below the stable (level) point and still leave the wall in place.
Again, referring back to the diagram, allow the 1/2" wallboard to hang down
below the bottom plate by 1". Then nail a 1/2" x 1 1/2" nailing strip to the
front of the base plate where wallboard has been installed. This will flush
the wall out and serve as a spacer where the base moulding will be installed.
For this measurement you will need to use 4-inch base mouldings. When you come
to the doors, wrap the studs (rough opening) so the base moulding will be behind
the doorjambs. The doorjambs will be cut so the bottom of each jamb is flush
to the bottom of the door and the entire system is raised 3 1/2 inches off the
concrete floor. Depending on your ceiling height, it may be easier to frame
for the rough opening so the entire prehung door is raised to the 3 1/2-inch
height or you will need to cut the door down. If it's a hollow core door, you
will need to replug the bottom of the door.
The finished rough opening for doors—on a 30" door—should be 32"
plus 1 1/2" for both jambs, plus the thickness of your base mouldings (both
sides), say 1", and another 1/2" for extra space for the base moulding to slide
up behind the doorjambs. This will allow 3/4" on either side for shims when
installing the door jambs. Your total for the rough opening, if using 1/2" base
moulding, would be 35" wide. Normally the finish height of the rough opening
would be 6' 10 1/2"; again, this depends on your ceiling height. There is one
last point to consider: the casing around the door. Your base moulding also
has to slide up behind the casing, so the casing has to be built out away from
the wall, providing clearance on the backside of the casing and the face of
the base moulding. The easiest way to accomplish this is to put jamb extensions
(wooden strips) on both the jambs and walls. Hold the extensions back from the
edges of the jambs by 1/4" when installing. Then attach the second extensions
to the backside of the casing on the heel side (the thickest side)—this
way you can sand the two together. Remember to hold the extensions up 4" from
the bottom of the casing and door jamb to allow the base moulding to slide upward.
To understand more about framing rough openings and jamb extensions, I recommend my book, Remodeling a Bathroom. Chapter 2, "Demolition and Framing," and
Chapter 5, "Working with Wallboard," outline the proper procedure
in-depth and feature great photos and diagrams. To order your copy, click here or click the purchase button below!

If you are installing a bathroom in an expansive soil environment, click
here
to update the floating wall construction to conform to an installation of
a bathroom.
I hope this helps and I always invite you back if you have any other questions—good
luck!
Copyright © 1999, 2001, 2005, & 2006 LAF/C.R.S., Inc. All
rights reserved.
Question answered by Leon A. Frechette.
[ Back to Top ]
|